I hope everyone had a happy holiday season. At the last moment we decided to pick names out of a hat and I was lucky enough to get my sister's name for the gift giving. She had admired my sketchbook that I submitted for the project so I came up with the idea of creating a planner or journal for her based on the ideas that I used for the sketchbook. This came to me when I was taking a card class at a local art store. They were offering a planner workshop that was designed to use photographs to create a scrapbook like planner as a Christmas gift.
As part of the workshop kit, you got an 8"x8" binder and enough 2 page per week spreads for the entire year plus extra pages for pictures and memorabilia. There were also some embellishments and scrapbook papers included in the kit. The spaces for photos were 4"x6" which I thought would be suitable for smaller reproductions of some of the sketchbook pages I had created using quotes from Rumi and Lao Tzu.
I signed up for the workshop but then Mother Nature intervened and Sarnia was hit by major snowstorms and we were under a state of emergency for almost a week. That set back my plans a bit. While I was house bound without the kit I did gather supplies and create watercolour background, as well as scour magazines for text expressions and dig out my favourite rubber stamps.
When the snow lifted enough to travel, I collected my kit and spent several hours at the store, stamping in the 2011 calendar onto the planner pages. With that task accomplished I was ready to create my gift in the remaining week before Christmas. Santa's elves had competition I can tell you. I was burning the midnight oil or should I say electricity. I had so many boxes of supplies open around the floor that it was like the day I unpacked my workshop. The cat was having a field day with the scraps of thread and paper.
Bit by bit the planner came together. I tried to make sure that the end result would be functional as well as interesting and thought provoking. Some page just seem to build themselves. Text excerpts from four or five different magazine ads would come together to express a completely new thought which would fit in perfectly with a quote or a picture or a painted background. You know those moments that seem somehow meant to be... The planner seemed to be filled with those. As if I'd been saving some of these bits and pieces for just this project, for just this time and for just this person. As they used to say on the A Team, "I love it when a plan(ner) comes together."
In my zeal to get everything completed and wrapped ---- I forgot to take any pictures of the construction or of the competed project for that matter. But I was pleased with it and I'm glad to say, so was my sister. She paid me that supreme honour of silence when she first saw it and then she put it to one side and said she needed to be alone to savour it when she first looked at it. You can't get much better than that, now can you.
Tuesday, December 28, 2010
New Painting
I've been working on a new acrylic mixed media project. This time it's been a picture of silver birch in the moonlight.
 This is a 9"x12" canvas.

The trees are in relief. They are are made from rolled strips of paper towel that have been twisted and glued with a watered glue mixture onto a gessoed canvas. The thinner branches were made with thin cord. The entire canvas was then painted black and then with varying shades of blue/gray. The trees were then sponged white and the recesses shaded with brown. The moon was dry brushed with a luminous dove gray.
This is my first attempt at trees. I have a ways to go if I'm aiming at realism but for an impressionistic view I think I got the idea across at least. I enjoyed trying, at any rate.
Tuesday, December 7, 2010
Sketchbook Project
I sent it off on December 1 and it arrived in Brooklyn at the Art Library at 11:55 on December 4, 2010. My sketchbook is now officially part of the project and out of my hands.
I have been busy for the past few months working on ideas for my theme, "It must be". This is the first time that I've worked on anything that I've known anyone other than myself was going to see and I found that it made a big difference.
Rather than being able to just dive in, I found that I was stuck at the beginning. I couldn't begin at all. Even though I chose my own theme I couldn't seem to find the right way to approach it and I was convinced there was a RIGHT way. I racked my brain thinking of ways to end the phrase "it must be..." and while they seemed promising my ideas always fizzled out.
Eventually, I decided that there wasn't ONE right way to go about it and I could use the phrase for anything and everything. Once I looked at things from that perspective the content of my book was easy. The next step was the medium.
Tackling a sketchbook was a bit optimistic if not arrogant on my part. I can't draw or sketch. I've read the part where everyone can draw, it's just practice. That may be true -- but I haven't practised and I didn't think I had the time to take lessons. What I wanted to do, and what I felt the purpose of the sketchbook was, was to express myself. That I could do in my own way, on paper. I chose to do it through pen and ink, paint, paper, scissors and glue.
So, in the final analysis, it's not so much a sketchbook (although, I did put in a sketch or two) as a mixed media book.
My theme: It must be ...
It must be what? Whatever I want it to be.
Light, dark Happy, sad Contemplative, interactive
Original, quotations Colourful, sombre
Hopefully there will be at least one page that strikes a chord with someone. This is the biggest risk I have ever taken and I'm glad it's out of my hands now.
Here are a few of the spreads.


If you browse the project, check out CAW230
Foil Technique
I belong to the ning site Lovin Mixed Media hosted by Gary Reef who is an incredible artist. He freely shares his techniques through video tutorials and one of the techniques he shared was how to use aluminum foil with acrylic paints.
The first step was to take some aluminum foil and crumple it up, then lightly smooth it out and attach it to your substrate. I was using a 5"x7" artist canvas and covered my canvas lightly in PVA to attach the foil, wrapping any extra around the sides and back. I took some additional foil and "made" a snake and attached it to the upper right of the canvas with PVA. I took a piece of an aluminum pie plate that had an interesting texture and placed it under the foil in the lower left of the piece and smoothed the foil over it to bring out the texture.
Then I added some acrylics to the mix.
 The glare is distorting the colours and I can't seem to get around that. I have an overhead fluorescent light in my workroom and it play havoc when I take pictures of anything with a shimmer.
The next step in Gary's technique is to put down a layer of bitumen. For me, in Canada, that is acrylic driveway sealer and white spirits or varsol. When that dark, tarry mix is painted on it darkens everything and then is taken back or removed with varsol to reveal the areas of colour you want seen.

As you can see, I removed quite a bit. It left all my colours darker, which I liked. I then used a Krylon gold leafing pen to fill in some areas and to vein some of the creases. I used a found object, a gold filigree heart, to give balance on the lower left. The background is a second artist canvas, 8"x10", that was spray painted with hammered bronze paint before being attached to the smaller canvas. This piece will be framed with a custom frame that I am making in my woodworking course.
The frame will be 3" wide and I plan on using a black gloss treatment on it. I'll post a picture when it's complete.
The first step was to take some aluminum foil and crumple it up, then lightly smooth it out and attach it to your substrate. I was using a 5"x7" artist canvas and covered my canvas lightly in PVA to attach the foil, wrapping any extra around the sides and back. I took some additional foil and "made" a snake and attached it to the upper right of the canvas with PVA. I took a piece of an aluminum pie plate that had an interesting texture and placed it under the foil in the lower left of the piece and smoothed the foil over it to bring out the texture.
Then I added some acrylics to the mix.

The next step in Gary's technique is to put down a layer of bitumen. For me, in Canada, that is acrylic driveway sealer and white spirits or varsol. When that dark, tarry mix is painted on it darkens everything and then is taken back or removed with varsol to reveal the areas of colour you want seen.

As you can see, I removed quite a bit. It left all my colours darker, which I liked. I then used a Krylon gold leafing pen to fill in some areas and to vein some of the creases. I used a found object, a gold filigree heart, to give balance on the lower left. The background is a second artist canvas, 8"x10", that was spray painted with hammered bronze paint before being attached to the smaller canvas. This piece will be framed with a custom frame that I am making in my woodworking course.
The frame will be 3" wide and I plan on using a black gloss treatment on it. I'll post a picture when it's complete.
Sunday, December 5, 2010
Remember the Woodworking Post
Do you remember the wooden cover I posted a while back .... the one from my woodworking course? Well, I finally made something with it and the picture was downloaded when I downloaded the ones from BookBinding III. Do you remember what it looked like?

Well, here is what the finished book looks like.

After staining the oak ovals, I gave them a coat of varathane and lightly sanded them and them put another coat of varathane on them. Then I put eyelets into the predrilled holes. Because the wooden covers were thick, I was able to insert an eyelet into each side of the cover.
I drew a template to cut out my signatures for my text block and sewed them over leather thongs that were then laced through the centre four holes of the covers. The middle two thongs were tied together as you see in the picture above and used as the book closure. The upper and lower thongs were threaded through the remaining eyelets and glued down.

I had a single earring and used that as the decoration for the cover. I traced that onto the book and then carved a groove that would allow me to embed the medallion into the wood for gluing. I didn't like the bald look of the brass meeting the wood, so I used some silk cord and glued that around the circumference of the medallion. This seemed to give it the definition is was missing.
I can't say that this book was well designed because I drilled the holes in the wood without really thinking through the book design. That sort of came after and is not the way I would do it in retrospect. I definitely put the cart before the horse in this project and most of the time I was working out how to make things work. In the picture with the book open, you can see the problem I ran into with using an oval.
I still like the idea, though. I'm just going to think it through from the perspective of a book first, before I cut the wood. I'm not going to let the power tools go to my head.
Posting at Last
I've finally downloaded my pictures from Book Binding III and I'm ready to post them. It was such a busy class that I'm ashamed to say that I didn't take as many pictures as I hoped to. I got so involved in what I was doing that I didn't remember to take pictures as I went along so I didn't document the steps as well as I wanted to. That's because Dan is such an interesting teacher. I should have my camera ready when he demonstrates, rather than thinking that I'll take pictures of my work in stages. I should just know by now that I never remember to do that.
Well, any way, here goes. We were making two books this time. Both books were being sewn over cords. One was sewn over flattened cords.
 We used hemp cord that was untwisted and combed for our flattened cord. I just taped mine to the litho stone I was using to pare my leather to hold them in place while I was sewing the signatures. I used a diagonal pencil line to keep my signatures in order while I was sewing them. There is a kettle stitch at the head and tail of the text block.
 The signatures were held down with a brass weight during the sewing.
The second book was sewn on raised cords and I used a packed stitch for sewing the signatures over these cords.
 The packed stitch is wrapped around the cord and goes back through the original hole in the signature. Once again, there is a kettle stitch at the head and tail of the text block for stability.
 These books were constructed with leather hinges that were attached to the endpapers that were hooked into the text block.

The burgundy is the endpaper for one of the books. The turquoise is dyed goat leather.

The endpaper is also lined with a protection package so that the leather of the hinge does not emboss itself upon the endpaper leaving a ridge. This will be removed before the hinge is pasted down.
 These were the finished endpapers for the two books waiting to be sewn onto the text blocks. The endpapers were coordinated with decorative papers that were going to be used for the covers.
 I chose the burgundy to go with the marbled paper and the taupe to work with the metallic paper. I'd never worked with a metallic paper before. They require delicate handling when they are wet as some of the metallic pigment will flake at fold areas at that time.
Finished books:
The book sewn over flattened cords was given a ribbon attached to the spine. The endband was hand sewn with linen thread in a conservation stitch over a hemp core. The endcap was formed to cover the tube of the hollow spine. The leather hinges provide easy opening of the covers of the book.


The book sewn over raised cords has a solid back. The endband was sewn with two colours of silk, chosen to coordinate with the marbled cover paper, over a core of hemp. The head of the text block was given a colour treatment of a light burgundy dye and sealed with wax.

The leather was worked around the raised cords so that their appearance would be pronounced.
 The leather on the corners of both books was pared very thin and then pleated and mitred as it was glued to the board. This reduces bulk and produces a neat, and if well executed (by a better hand than mine) almost invisible corner. One of my corners almost reached that exalted state.
These bindings, unlike cased in books, are extremely strong and long wearing. This is the type of binding that would be done with full leather in the Middle Ages.
It was a great class.
Well, any way, here goes. We were making two books this time. Both books were being sewn over cords. One was sewn over flattened cords.


The second book was sewn on raised cords and I used a packed stitch for sewing the signatures over these cords.


The burgundy is the endpaper for one of the books. The turquoise is dyed goat leather.

The endpaper is also lined with a protection package so that the leather of the hinge does not emboss itself upon the endpaper leaving a ridge. This will be removed before the hinge is pasted down.


Finished books:
The book sewn over flattened cords was given a ribbon attached to the spine. The endband was hand sewn with linen thread in a conservation stitch over a hemp core. The endcap was formed to cover the tube of the hollow spine. The leather hinges provide easy opening of the covers of the book.


The book sewn over raised cords has a solid back. The endband was sewn with two colours of silk, chosen to coordinate with the marbled cover paper, over a core of hemp. The head of the text block was given a colour treatment of a light burgundy dye and sealed with wax.

The leather was worked around the raised cords so that their appearance would be pronounced.

These bindings, unlike cased in books, are extremely strong and long wearing. This is the type of binding that would be done with full leather in the Middle Ages.
It was a great class.
Saturday, November 13, 2010
Book Binding Part III
I've been away these past few days taking the first part of Bookbinding Part III with Dan Mezza. He is a bookbinder in London, Ontario who does restoration work on rare book collections and also teaches courses for CBBAG (Canadian Bookbinders and Book Artists Guild).
I've been busy paring leather for exposed hinges on two books as well as preparing two text blocks. One, a simple lap stitch, sewn on flattened cords and another a packed stitch over raised cords. During the break before the last part of the course (in a week's time) I'm going to make another text block to try out the stitching over split cords. These are replicating medieval historical bindings. We won't be doing full leather bindings because we won't have enough time to complete both books that way. We'll do that in another workshop.
I've taken some photos of the work to date and I'll post them as soon as I've transferred and cropped them.
Paring leather takes a sharp knife and muscles in my hand that I'm not used to using. I have to admit, it is quite amazing just how thin you can pare the leather when hand, eye and knife come together and work in conjunction with each other. Dan seems to make it look like he is cutting through butter with a hot knife. He place the knife where he wants to begin his cut and then the excess leather peels away like apple from the core.
I pick up my knife and try for the same fluid motion and nothing happens. My knife is still at the starting point. Eventually I get things started but my apple, or rather my leather does not peel in one easy piece. I seem to start and stop or waver up and down. All things come with practice and if I am to believe Dan, after 15 years or so, I'll find it just as easy as he does. He tells me that I'll feel the leather with my finger tips.
After one hour you don't not feel with your finger tips. In fact, it is hard to feel your finger tips themselves. Eventually, you can get into a kind of Zen state of paring where you seem to be one with the knife and you get into the rhythm of feel of paring. Unfortunately, by that time, your practice piece of leather looks a little worse for wear and it's time to start with a fresh piece.
All leather does not pare equally. Even leather taken from the same hide will pare differently when taken from different areas of that hide. Leather made from different animals will be harder or easier to pare and that can also be determined by the tanning process. For our final practice, we used leather from the hide that we were going to use for our books.
I think that was the hardest part for me. To cut into my pristine goat hide and take strips for the hinges and for practice purposes. Like the words of the song.... "The first cut was the hardest".
I purchased an English leather paring knife but it needs to be further sharpened since it is basically a blank. I started sharpening under Dan's guidance and will move to a finer grit stone this week. While I was at his studio I used an English knife and a French blade which is rounded rather than pointed. I can seen that both have their uses and if I were to work consistently with leather I would probably want to have both.
Photos to be posted soon.
Thursday, November 4, 2010
Sketchbook Project
One reason that I haven't been posting a lot is that I've been busy working on my sketchbook for the 2011 Sketchbook Project. I want to get my book finished and posted as soon as I can so I've been working diligently on it (as life permits). This is a first for me. I've never participated in something like this before where my work was going to go public so naturally I'm quite nervous.
I, like many others, found that the paper in the supplied moleskine was very thin so I took my book apart and I've substituted a heavier weight paper (140 lb cold press) that wouldn't bleed through if I used markers and wouldn't buckle under wet media. This meant rebinding the book and while I'm at it I'll put a different cover on it to replace the simple kraft paper cover that I received.
According to the rules, I need to keep the same length and width dimensions for the sketchbook and keep the bar code on the back cover so that it can be tracked. Beyond that, I have some flexibility. Since I do more of a visual journal that an actual "sketch" book (my sketching ability being weak) I'm glad of the flexibility.
My theme is: It must be: that allows for a lot of creativity as far as I can see. I can start out with some background i.e. it must be me and then work into things that I like, such as it must be books etc.
I hope to get it finished and sent off by the end of the month. That's my target.
I'll take a few pictures of the finished product and post them when I'm done.
Friday, October 29, 2010
Busy Times
I've been busy but I have posted anything about my projects. A quick update.
My woodworking class has been going well. My frame is complete and is just waiting its coat of paint. I've given it a final sanding and just have to find the gloss black that I want to complete it. I should take a before and after picture for posting.
My last woodworking class was about using the band saw and scroll saw. The project was to make a two piece Christmas tree out of 1/4" thick wood and when the pieces were slotted together, the tree would stand up. One piece had a slot in the top and the other had a slot in the bottom - you know the type. I chose to do some of the cuts on the band saw (the blade always cuts down so the wood doesn't jump around as much) and the more curvy cuts on the scroll saw. I have a harder time with that one because the blade goes up and down so the wood wants to rise from the deck of the saw.
It didn't turn out too badly. I haven't taken a picture yet, but I will. More practice is definitely needed. After that I tried a piece with interior cuts on the scroll saw. For this, you need to drill holes in the pieces to be cut out and thread the scroll saw blade through the drill hole in order to cut out the piece. I finally understood that I control the speed at which the wood moves (duh!) so I was able to slow things down and control my turning of the wood a bit more precisely. I still need practice with turning 90 degrees to make a sharp corner. I tend to wander and make a rounded corner instead. At this point I need to be forgiving with myself because I've only been working with the scroll saw for 2 hours. I'm happy when I can stay on the pencil line.
Those two hours have given me a great appreciation for those who do fretwork on the scroll saw. The patience and skill required for that work -- wow!
I am really enjoying these classes and I'm sorry that we have to take a break for the next three weeks. Our instructor will be away and we won't resume until the end of November. Oh well, it's not like I don't have other projects on the go to keep me busy.
Friday, October 15, 2010
Old School Bookbinding
This bookbinding video came my way and I wanted to share.
Bookbinding Old School
At this point I don't know any other way of showing it, so I'll just post the You tube link.
Life has been busy but I'd be hard pressed to tell you exactly what I've been doing. I have been to my next woodworking class though. I have an update to post. Here are pictures of two sets of wooden books covers that I am working on.

This is an oval cover with it's first coat of stain. I used the drill press to place holes 1/4" from the routered edge. I'm going to use a Coptic binding for this book. I have to sand between coats of stain and then use varathane on the cover to seal it. I'm thinking of embedding a small metal medallion in the front cover -- just a thought at the moment. If I do that -- it will be done before the varathane.

This square cover has a translucent stain on it and as you can probably tell from the position of the holes, I'm going to use a raven's claw binding on this one so I'll be sewing over cords that will be going into the holes. I think I will use leather thongs. You can see the small, yellow, plastic painter's pyramids that the board is resting on. These keep the board up off the surface of the table so that I can paint the sides of the piece. They are very handy. I got them from Lee Valley .
My picture frame is complete and clamped and the glue is setting as I write. I should be able to post a picture after next week's class when I pick it up. I wanted it to be quite angular not soft since it is going to frame and abstract mixed media piece. I haven't decided whether it should be a gloss or matte black but I think it should be dark to set off the artwork.
Friday, October 8, 2010
Woodworking Class
I've finally started my woodworking class. It's something that I've been trying to do for years but every time I've signed up for one it's been cancelled for lack of interest. This time I found a class that only required a minimum of two people to run. Luckily, I was the second person to sign up so the class was a go.
It's being held in a proper woodworking shop with floor tools and hand tools available. There are table saws, drill presses, band saws, scroll saws, a compound mitre saw, router, planer, joiner, lathe and belt sander.
The first week was spent getting to know the tools and what they did and learning general safety procedures of the workshop. I was the only student the first week so I had a chance to try out the table saw. To adjust the blade to different heights and to adjust the fence to different distances so that I could cut the correct width of wood that I needed and cut out a notch in a piece of wood to the correct depth that I wanted. I learned how to calibrate the saw to ensure accuracy of my measurements. My instructor, Clarence Jay, is a very patient and knowledgeable man.
Just making that simple 1/4" notch made me realize how easy it would be to make the paper storage unit I'd been wanting for so long. With every new thing thing that I learn I see applications right away. I am so happy with this course.
Our first project is making a picture frame. What a perfect project for someone who likes art!!! It wasn't my idea, it was Clarence's. He wondered if I would have any use for it... We aren't using expensive premoulded framing wood -- we are using a pine plank and cutting it down to the size we want and shaping it how we want. We will be getting several frames from one plank. Just think of the savings and the possibilities??
Next week I will be look at several different router profiles before making my decision about my frame. I'm just loving this!! I don't sound too excited, do I?
More to come...
P.S. while I had some extra time, I was able to use the drill press to drill some holes into some wooden panels that I plan to use as book covers for some Coptic bindings I'm planning. I'll post some pictures when they are completed.
Saturday, October 2, 2010
Folded Book
I enjoy collecting Quotes -- I always have done. I have a journal that is dedicated to that purpose and when I come across a stamp that has a quote that I like it gets added to my collection. My stamps seem to consist of nature stamps and quotations. I think that's why I like Quietfire Designs so much. Suzanne Cannon is a talented calligrapher and she uses that talent to good effect with quotations. That's were I got most of the stamps that I used on the next booklet I made. It's made from three folded 12" x12" sheets of card stock. Each overlapping by one 6" x 6" square.

The copper tag is debossed with the word "Natural" and the stamp "creative journey" is from Quietfire Design. The background of the cover is wallpaper border.

You can see how the book opens up. I used a green/grey card stock with a mix of pictures, stamps and quotations.

The brighter green is a handmade mulberry paper that was cut into triangular shapes that wouldn't interfere with the fold lines. The small leaves were from punches.

To complement the quotations I found pictures from magazines.

In the bottom corner I included a small booklet.


The ribbon is used to tie the folded book closed. This type of folded book can be used for a variety of purposes. It can make a handy mini album with plenty of space for journalling.
Tuesday, September 28, 2010
A Book for a Friend
A have a friend who has been writing poetry for a while as part of her healing process. She confided that one of her greatest wishes is to publish her work. I couldn't make that wish come true, but I could bind her existing collection of poetry into a book for her.
This was my first experience with actually printing and binding text. I experimented both with Microsoft Word 2010 and Publisher 2010. I was able to get Word to generate a Table of Contents and update it easily. I didn't however like the print preview portion of the program because I couldn't see how the pages were going to line up for double sided printing.
I was using a booklet format 5.5 x 8.5" and I wanted to make sure the imposition of the numbers was correct. I do have a more professional program Page Plus4 that I have purchased for this purpose, but I wanted to see what the Microsoft programs had to offer. I found that Publisher did a good job of the printing when I imported the Word document into it but I couldn't find enough information in the help section to be able to update the Table of Contents in Publisher. I guess I'll have to search Amazon and see what they have to offer in the way of resources. Publisher lets you insert a Table of Contents so it must be able to create and update one.
Anyway, here is a look at the finished product.

I used a faux leather (heavily embossed) for the spine and a bronze, brown, gold and white paisley paper for the cover. I used a coordinating striped paper for the endpapers.

It is a slim volume so I made it with just one signature and used a five hole pamphlet stitch to sew it.

I kept the page numbers to the bottom center of each page. I used the Calabri font and kept the body of the poetry at 10pt. which was quite readable in this size book. The poems were arranged in chronological order.
I made note of things that I might do differently and I am going to try the same project using Page Plus4 to see if it makes some of the procedures easier.
My friend was quite pleased -- even if she wasn't "published" she did have her work in a hard cover book.
Wednesday, September 22, 2010
Altered Books
What got me interested in bookbinding in the first place was altered books. I've been dabbling in this medium for several years now. I started creating altered books and using them much like visual journals to express feelings and emotions and then got caught up in the various techniques for altering the books themselves.
Once again, it wasn't easy to find classes in my town so I used the Internet as my source of information and instructions. Luckily, there are several Yahoo Groups that focus on this medium and they were and are a big help to me. I did eventually find a group of like minded individuals in my home town but I came in at the end of a Round Robin and the group folded the next year. It was fun while it lasted, though.
Here are some pictures of an early altered child's book. I used this one to express how I feel when I'm seriously depressed. I was lucky enough to find magazine images that worked with my poetry and I used distressing techniques on the pages to make them seem dark. I used a ransom font to add to this effect.

I used white acrylic on the front cover and then stamped the title, "It's been a bad day" using Stazon ink. I used ink to darken and distress the cover.


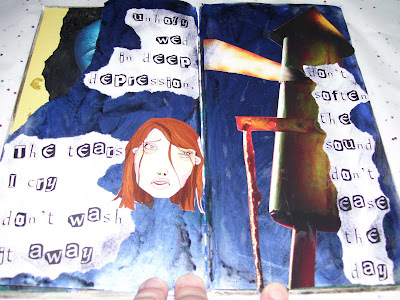

I used the Lumiere acrylic paints on the backgrounds and then darkened them with black ink that pounced on top. I tore the edges of the pages and used ink to make them look like they'd been burned.
This is definitely one of my darker books but I don't think that all work needs to be light and positive. I was actually quite pleased with the way that this book came together.
Once again, it wasn't easy to find classes in my town so I used the Internet as my source of information and instructions. Luckily, there are several Yahoo Groups that focus on this medium and they were and are a big help to me. I did eventually find a group of like minded individuals in my home town but I came in at the end of a Round Robin and the group folded the next year. It was fun while it lasted, though.
Here are some pictures of an early altered child's book. I used this one to express how I feel when I'm seriously depressed. I was lucky enough to find magazine images that worked with my poetry and I used distressing techniques on the pages to make them seem dark. I used a ransom font to add to this effect.


This is definitely one of my darker books but I don't think that all work needs to be light and positive. I was actually quite pleased with the way that this book came together.
Saturday, September 18, 2010
Symphony of Science - 'Our Place in the Cosmos'
I just had to share this video. It's on You Tube but it comes from Symphony of Science. There are others in the series. The musician, John Boswell, remixes quotes from famous scientists and excerpts from videos into this music videos. I hope you enjoy it as much as I did.
Our Place in the Cosmos
I had hoped to add another video here but I can't see to make that happen so it will appear in another post. Check out the site.
I had hoped to add another video here but I can't see to make that happen so it will appear in another post. Check out the site.
Symphony of Science - The Poetry of Reality (An Anthem for Science)
Here is another of the science/music videos. I hope you enjoy it as well.
The Poetry of Reality (An Anthem for Science)
The Poetry of Reality (An Anthem for Science)
Thursday, September 16, 2010
Historical Binding - Leather and Papyrus
In 2009 I was able to take another workshop with Don Taylor at the Labatt's Visual Arts Centre at the University of Western Ontario. This workshop focused on replicating a historical leather binding and using papyrus as the paper.
I had not long had pins removed from a fractured right wrist (and yes, I am right handed) so even after a summer of physiotherapy my leather work was not quite as precise as I would have liked. I enjoyed the workshop immensely in spite of that little handicap.

We used onlay (the overlaying of leather on leather), tawed vellum insertions (those are the very light woven lines), some gold leafing, and some embroidery stitches (tacks in each corner and a woven stitch across an open section of leather). I used a warm brown as my full cover leather and a rich red as the onlay.


You can see that the book is held closed with small leather straps that have rings on the ends. These rings fit over knots of leather to hold the book closed.

You can also see that the endpaper is edged in red leather before being attached to the cover. This gives added strength to the structure. The cover was made from laminated sheets of papyrus (they were glued together for strength).
If you were to look closely at the pages, you would be able to see the actual striations of the plant material as it is laid vertically and horizontally.
We used guard structures when we sewed the signatures so that the fine hemp cord would not tear the papyrus. These were thin strips of folded vellum that were placed in the centre of each signature to take the stress of the threads. A handsewn headband and tailband was extended into a support stitch on each cover to provide stability when the book was opened. The red leather edging covers all but the very ends of these stitches.
While those with more dexterity were able to do much more elaborate onlay work -- and some of it was truly amazing -- I was pleased with the fairly simple geometric designs that my wrist allowed me.
If you have a chance to take a workshop with Don, try it.
I had not long had pins removed from a fractured right wrist (and yes, I am right handed) so even after a summer of physiotherapy my leather work was not quite as precise as I would have liked. I enjoyed the workshop immensely in spite of that little handicap.


You can also see that the endpaper is edged in red leather before being attached to the cover. This gives added strength to the structure. The cover was made from laminated sheets of papyrus (they were glued together for strength).
If you were to look closely at the pages, you would be able to see the actual striations of the plant material as it is laid vertically and horizontally.
We used guard structures when we sewed the signatures so that the fine hemp cord would not tear the papyrus. These were thin strips of folded vellum that were placed in the centre of each signature to take the stress of the threads. A handsewn headband and tailband was extended into a support stitch on each cover to provide stability when the book was opened. The red leather edging covers all but the very ends of these stitches.
While those with more dexterity were able to do much more elaborate onlay work -- and some of it was truly amazing -- I was pleased with the fairly simple geometric designs that my wrist allowed me.
If you have a chance to take a workshop with Don, try it.
Wednesday, September 15, 2010
Box Making
In the summer of '09 I was lucky enough to take a workshop on Box Making through the Southwestern Ontario Chapter of CBBAG. The workshop was held at the Labatt's Visual Arts Centre at the University of Western Ontario and the instructor was Don Taylor.
We spent a morning making paste papers from wheat starch paste (it's used in bookbinding) and various dyes and pigments for colouring. The print making room we were working in had large drying racks that could store the paste paper while we began the task of cutting the Davey board (a heavy cardboard) to the sized that we would need for the box that we were going to make.
Our goal was to make a box that looked like a book with a rounded leather spine over raised cords. When you open the front cover of the book, you would be opening the lid of the box. We were then given the option of making a tray to fit into the box, making it a two layer box.
We used a strong PVA glue to hold the pieces of the box together and wheat starch paste to cover the box with the paper and leather (the same procedure we would use when covering a book).
Here are pictures of my effort:
You can see in the first picture that a gold lined paper was used to simulate the pages of text in a book. It gives the impression that the pages have gilded edges.


I used an orange leather to match an orange/gold paste paper that I had made earlier in the workshop. The paper had a soft sheen to it and the colour seemed to be a gradient from gold to orange.

The box has a leather hinge and dividers in the bottom tray. The interior is lined with a soft brown embossed paper.

I was unsure about a tray so I made one anyway that could be covered if I decided to use it.
During this process I found that a small set square was invaluable for making sure that my corners and box walls were 90 degrees. Square metal weights were also useful to hold the walls in place while the were drying to make sure that they dried perpendicular to the base. We used screw set dividers to replicate measurements so that we could be sure of accuracy. Accurate measurements were very important in each step.
It was a very interesting exercise and I'm sure that it gets faster with repetition. Don seemed to have no trouble at all putting his box together. I seemed to be all thumbs.
We spent a morning making paste papers from wheat starch paste (it's used in bookbinding) and various dyes and pigments for colouring. The print making room we were working in had large drying racks that could store the paste paper while we began the task of cutting the Davey board (a heavy cardboard) to the sized that we would need for the box that we were going to make.
Our goal was to make a box that looked like a book with a rounded leather spine over raised cords. When you open the front cover of the book, you would be opening the lid of the box. We were then given the option of making a tray to fit into the box, making it a two layer box.
We used a strong PVA glue to hold the pieces of the box together and wheat starch paste to cover the box with the paper and leather (the same procedure we would use when covering a book).
Here are pictures of my effort:
You can see in the first picture that a gold lined paper was used to simulate the pages of text in a book. It gives the impression that the pages have gilded edges.


I was unsure about a tray so I made one anyway that could be covered if I decided to use it.
During this process I found that a small set square was invaluable for making sure that my corners and box walls were 90 degrees. Square metal weights were also useful to hold the walls in place while the were drying to make sure that they dried perpendicular to the base. We used screw set dividers to replicate measurements so that we could be sure of accuracy. Accurate measurements were very important in each step.
It was a very interesting exercise and I'm sure that it gets faster with repetition. Don seemed to have no trouble at all putting his box together. I seemed to be all thumbs.
Subscribe to:
Posts (Atom)