Thursday, November 25, 2021

Mathematical (Curve) Stitching Lesson 5

 Curve of Pursuit

Lesson 5 Presentation Video

Lesson 5 Presentation Extras

The parabola was the first curve that was introduced. In order to take the idea from abstract, inanimate things and forces  to the real-life examples, one of the first examples that young children were introduced to was the Curve of Pursuit.

This story was explained in Mrs. Boole’s Lectures on the Logic of Arithmetic (Clarendon Press).  Briefly, a dog sees a rabbit who is some distance away from his burrow.  All three points, Dog, Rabbit and Burrow and marked on a piece of paper.  The dog begins to run (in a straight line) toward  the rabbit and the rabbit begins to hop in a straight line towards its burrow. They are both moving at the same speed.  As the dog sees the rabbit change location, he changes his trajectory to realign his pursuit with the rabbit. 


How to Draw the Curve of Pursuit (video)

Pursuit curves do not have to be about just two animals.  There is also the predatory bug story. In this story, four bugs are in opposite corners of a square.  They begin to chase each other in a counterclockwise direction.


To create the multiple curves of pursuit, you mark an equal distance on each side of the polygon and connect the marks. On the new, smaller polygon, mark the same equal distance again, going in a counterclockwise direction. Connect the new marks.  Keep repeating this step until you can no longer measure the distance you’ve chosen on the side of the polygon. (you can rotate in either direction as long as you are consistent.

For a triangle you would have the following end result by using the same procedure:


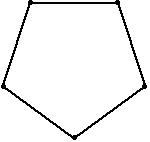
You could do the same thing for any polygon: pentagon, hexagon, etc.

After making a pattern on lightweight paper, pierce the intersection points of the lines.  These will become the sewing holes for your curves of pursuit. You could do each one in a different colour to make them stand out or keep them in the same colour for the optical illusion effect. You may have seen the square (4 curve) pattern as a zentangle pattern. 

These curves can be tiled for interesting effects. 


from instructables 


You've seen the Curve of Pursuit in quilting also. It is known as the Twisted Log Cabin block. 


It has also popped up in knitting patterns which can be found on Ravelry and Woolly Thoughts.


This is just FYI

If you'd like to learn even more about Curves of Pursuit and what happens if you change the variables, such as whether the dog and rabbit run at the same speed, do they run the same distance, do they change course, etc. Here is a link to an excellent article that will take you even further down the rabbit hole (pun intended).  It will show you some developments in high end mathematics, computers and optical art from the late 1800's to the present day.

The Mathematical Tourist


Some interesting designs created by changing the variables.


Non equilateral triangles


Pursuit curves in star shape


Pursuit curves in rectangular shape


Taking the quilting idea further ...

You should visit Anna Grossnickle Hines ' blog to see her quilt "Solstice"


or look at these ideas for Twisted Log Cabin quilts which were found on Pinterest


A book recommended to quilters is "Simply Amazing Spiral Quilts" by RaNae Merill


To see circular, spiral quilt steps and patterns use this link Quilting Solutions: Spiral Quilt - Part II  

Zentangle:  Paradox  Rick Robert's Paradox - YouTube

To see the math behind Rick Robert's Paradox use this link Math behind the Paradox


Thursday, November 11, 2021

Mathematical (Curve) Stitching Lesson 4

Lesson 4 Presentation Video

Mystic Rose

This can be a fairly dense design depending upon the number of points you choose to have around the circumference of your circle.  With an even number of points, the diameters will cross at the center but with an odd number of points the diameters will leave a regular polygon shape at the centre.

 10 point  11 point


Partial Mystic Rose designs, while not a true example of curve stitching, can produce some very interesting patterns that can be useful when creating your own designs. 


Using different coloured threads you can make an interesting effect or using the same thread you can make a kind of peacock tail or fan effect.


Bipartite Graphs

A bipartite graph is not actually an example of curve stitching but it can produce interesting designs. In a bipartite graph, one set of vertices is connected to another set of vertices but not connected to the vertices within its own set. In a complete bipartite graph, all the vertices in one set are connected to all the vertices in the second set. 


All the vertices in set S are connected to all the vertices in set T.  The graph would be known as  K 4,3

Bipartite graphs can also be shown in a circular format for a more interesting design.

 K 8,8K 8,8   K 8,8  


The following is a link to a site that will create circular bipartite graphs to the specifications you enter.

Bipartite Graph Creation Program


This template is useful when creating bipartite graphs by hand.


Some more examples:


Monday, November 1, 2021

Mathematical (Curve) Stitching Appendix


Using Cutout Areas When Stitching

Of the previous designs we’ve looked at, a few of them lend themselves to cut out stitching.  Any stitching that is secured around the perimeter of the shape will work.  Here is an example of an accordion book that I put together that uses a circle cutout as its main motif.  The circles line up exactly so that when the pages are folded, the stitching can be seen as though through a tunnel.


The stitching for the epicycloids would also work for this cut out style since the stitching is just around the perimeter.  The cardioid and nephroid and Epicycloid of Cremona (n=4) would fit the criteria.


Cut-out squares could also work, although the designs of stitching to fill the squares is not as plentiful as for the circles.  In Curve Stitching you are basically limited to designs that use the parabola in the corners or draw a larger circle around the square and just use the points where the square touches the circle as stitching points. 


The outer square represents the cardstock, the dotted line represents the stitching line and the red dots are the holes that are punched into the cardstock.  The solid square is the cut out section. This is what you would see on the back.  You would need to draw the circle in order to determine where the line would touch the square for stitching.  The second diagram shows what you’d see on the front. Or you could try the variation that would leave you with the square iris (cut out the square shape as above and simply stitch around the square as you would if it were a circle). 

Just as with the circle cut outs, varying the length of the chords would change the diameter of the hole in the center.

Other polygons could also be used as cut out shapes.  Because polygons have angles and straight sides, they will give some version of a parabola like curve if each side has the same number of holes.


Ways to Display Your Stitching

Cards

Curve Stitching makes excellent designs for cards.  There are plenty of designs on the internet for cards for all occasions that make use of the basic elements of curve stitching.  Since curve stitching adapts so well to card stock, it is a natural for card making.

Erica Fortgen and Joke De Vette are two authors who have written many books with patterns that use curve stitching designs.  We will be taking a look at some Christmas card designs in the next class.

Because we are working on paper, these designs are easily mounted in frames for display.


Books

You can also display your work in a journal or a more sculptural book like an accordion book which will stand to display your stitching.  

Here is a link to an accordion book that would be an effective way to store your samples.

Accordion Mini Album Tutorial    Einat Kessler

I used a different type of accordion book, made from custom sized envelopes to display a stitched alphabet and store the templates I used to create it.  Here is a video explaining its creation.

Storage Accordion  

Another way to use the accordion fold is to simply use it as the spine of your book (also know as a concertina spine) and attach the pages to the folds.  The flexibility of the spine will relieve some of the pressure on your stitching. 

Mini Accordion Hinge Book

Accordion Hinge Album  (same technique, just a different approach to the inner hinge page -- fast forward to 22:45 if you want)

Another book style for display is the flag book. It is quite a sculptural display.

How to Make a Flag Book

If you are interested in the Waterfall flipbook I demonstrated as my storage for samples in Lesson 2, I used the following videos for instructions.  The first video is by Peter Baumgartner, a German bookbinder.  There is no audio, but his actions are very clear, and he provides a template at his website (look below the video for the template).  I simply attached my covers at the side instead of at the top.  I used the second video for that inspiration.

Waterfall Flipbook Directions   Peter Baumgartner (notice he doesn't cover his book board covers with decorative papers before putting his book together.  He is just making a model)

Large Waterfall Card/Mini Album  I made sure my spine was full height and I reinforced the pull section on both sides. (i didn't want the seam - if I didn't have long enough paper - to catch) I didn't put a pull tab but made the back section longer and put in an eyelet with a ribbon pull.


Alternative Methods of Display

Since your patterns are done from the back, you can even think about stitching on a small, stretched canvas.  Plan you work out on graph paper, determine your colour changes, tape your pattern to the back of your canvas to pierce your hole and then use your pattern as your stitching guide.  The canvas will hold the tension for the stitches.  You can use a thicker thread to make your design show up against the canvas.

Just remember that you need to balance the thickness of the thread, the complexity of the design and the size/spacing of the design for maximum effect.  If your thread is too thick and your holes are too close together in a complex but too small design, you won't be able to appreciate the delicacy of the work you have created.  Whereas, enlarging your design and increasing the spacing of your holes might show the thicker thread to advantage.

Depending upon the size of your designs, you can frame them.  There are a number of items made to house 4" x 6" photos and small, square photos that could be used to display designs of a comparable size.  The small jewellery box that I showed as a sample was one such item.  Shadow box frames are another possibility.  It is also possible to purchase 2mm felt and that would have enough body to hold the thread tension of a design.  That could be used to make ornaments for Christmas or as a background for a design or for jewellery or other purposes.


These are just a few of the ways in which you can use of display the designs you create.

Happy Stitching


Related Posts Plugin for WordPress, Blogger...