Mathematical
(Curve) Stitching
Lesson 3
Designs
with Circles
Many of the
sewing cards that Mary Everest Boole created were related to circles and
involved chords.
The
chord of a circle can be defined as the line segment joining any two
points on the circumference of the circle. It should be noted
that the diameter is the longest chord of a circle which passes through the
center of the circle.
This is where the full protractor comes in handy for marking points evenly around the edges of your circle. Or this handy link: Printable CircleDivider
This is a 60 point circle (6 ̊)
72 point circle (5 ̊)
Op’Art (3) - Des tables de
multiplications aux courbes cycloïdales - Profmath
Using either of the patterns shown
above, many different designs can be drawn.
One of the easiest is to use equal
chords. Your circle can be divided into any number of segments, though the more
segments you use, the better your circle will appear. Use 36 sections and up.
Pick a starting point and a length for
your chord – how many sections away from your starting point will it be. The larger the number, the smaller the iris
(or hole) in the middle.
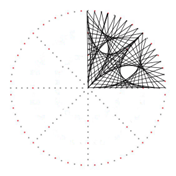
For this 60 point circle my chord went from 1 to 18
*What would happen if you tried this technique for stitching on a square? Try it and try varying the number of holes that you skip. Start anywhere and stitch 1 to 10 or 1 to 18 etc.
For this 72 point circle, two sets of chords were used. One set had a longer length than the
other. Colour was changed for
effect. The longer chord length was sewn
over the shorter one.
Family of Curves called Epicycloids
An epicycloid is defined as the
path traced by a point on the circumference of a circle as it rolls around
another fixed circle. One example of
this type of curve is the cardioid.

To stitch this pattern, number a 72 point circle from 1 to 72 such that 72 (0) will be at the top. Sew each number to its double. For example: 1 to 2, 2 to 4, 3 to 6 and so on. This works as far as 36 to 72. When you get to 37 it would be 74 but you don’t have a 74. 74 is 72 +2 so you will sew 37 to 2. You could continue to figure out all the new numbers but you’d soon realize that you are just starting to count by 2’s all over again, 2,4,6,8,10 etc So you would have 37 to 2, 38 to 4, 39 to 6, 40 to 8 and so on until you reach 71 to70.
Nephroid n=3 a
specific plane curve . It can be generated by a rolling circle with radius x on
the outside of a fixed circle with a radius of 2x
This is a similar pattern to the one
above, but instead of stitching to the number’s double you are stitching to its
triple. Using your pattern marked with
72 points, you would stitch 1 to 3, 2 to 6, 3 to 9 and so on. This works until 24 to 72. Then you begin the same procedure as before
25 to (75-72=3), 26 to (78-72=6), 27 to 9 etc and at 49 you will begin again 49
to 3, and so on until you are finished.
You could keep developing this theme
by stitching to the number’s quadruple and you would create the Epicycloid
of Cremona, which in named after a mathematician by that name. It is
created by a point on a circle rolling around a fixed circle that has a radius
three times its radius. It will create a
three cusped expicycloid.
If you would like to practice drawing epicylcoids, much like the Mathologer did the in the video in our Lesson Presentation, try this program: Segments. The number 80 in the upper left corner of the box refers to the number of dots around the circle. You can change that number up to 100. Change the S value to show what the iris looks like as the segments connect to different nodes in the circle. Change the M value to make a Cardioid (M=2), Nephroid (M=3), Epicycloid of Cremona (M=4) and so on. You'll be able to make several of the images you saw in the video but at your own pace.
FYI
Designs Involving Concentric Circles
Concentric circles are circles with a
common center point.
You have examples in the patterns below..
60/30 concentric circles
72/36 concentric circles
Multi-purpose circle pattern
If your outer circle has double the
number of sections as the inner circle you can try the following:
First example: Starting at 1, number both circles in a
clockwise direction. From the inner
circle, stitch 1 to 1, 2 to 2 and so on. Go around the inner circle twice, the
second time stitching 1 to the next number in sequence (31 perhaps or 37
depending upon the number of sections in the outer circle), 2 to the next and
so on. until you finish.
72/36
concentric circles
Both clockwise
Second example: Starting at 1, number the outer circle in a
clockwise direction and number the inner circle in a counter clockwise
direction. As in the previous example, from the inner circle stitch 1 to 1, 2
to 2 etc. You will go around the inner circle twice just as you did in the
previous example. You will end up with a
completely different result even though you started with the same pattern.
72/36 concentric circles
Outer clockwise; inner counter-clockwise
Using the multipurpose circle pattern
or the full protractor, what happens if you vary the number of holes in the
inner or outer circles, or vary the distance between the circles?
Not quite curve stitching but
interesting pattern. The sunflower
design.
Use 36/36 concentric
circles and stitch 1 to 1, 2 to 2 the first time around the inner circle. The second time around the inner circle you
will stitch 1 to 6, 2 to 7 etc. to make the petals of the flower.


