Thursday, August 25, 2011

Album workshop

On the 19th, 20th and 21st of this month, I attended an Album Structure Workshop hosted by the Southwestern Ontario Chapter of CBBAG.  The instructor, Dan Mezza, is a London area bookbinder and restorer of rare books.  He also teaches most of the Bookbinding core courses for CBBAG.  I am truly lucky that his studio is only an hour away.

During the three day workshop, we created three different album structures.  The most simple structure was a cased in album with a glued spine.  What made this structure interesting was that instead of the single pages being glued directly to each other, the spine end of the page was folded over 1/2".  This meant the one page was glued to the folded flap of the other.  This allowed the pages to open fully without the stress normally applied to a glued spine.  The folded edges also acted as spacers for the photographs that will be placed in the album.


Cloth spine and overmarbled paper cover

You can see the folded section of the page

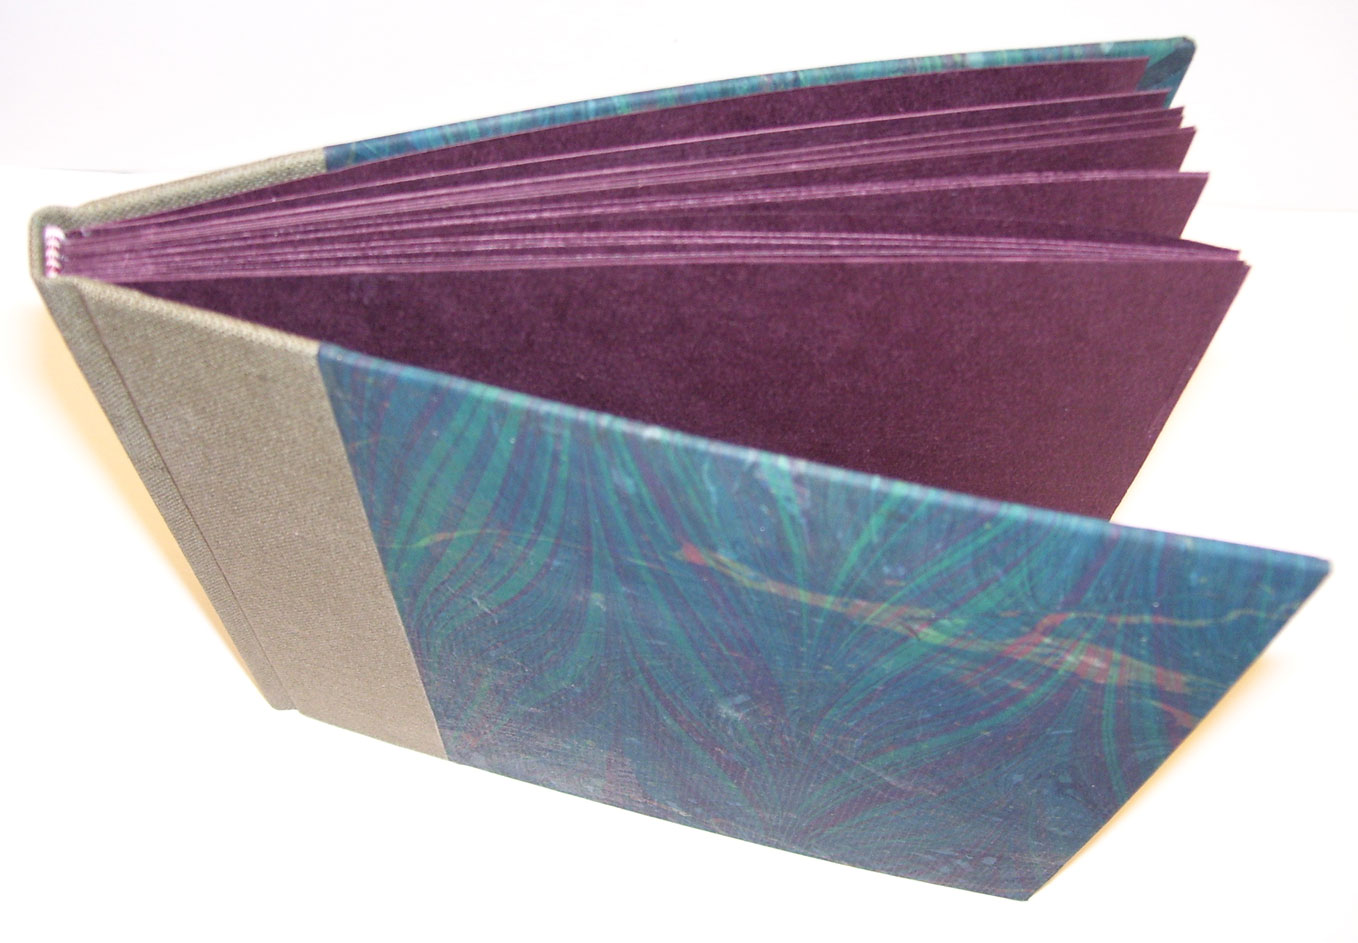
You can just see the slight extra thickness at the spine.


The next album was a stub album.  Each piece of folded paper in the signature was wrapped with a guard and the signature itself was wrapped with three guards.  This made a lot to sew through but the outer guards would end up being the stub that would hold the signature in place in the album. 

Each signature is sewn separately, the outer guards folded back to form stubs and pressed flat with a bone folder and put under weight.

The stubs are then aligned and the ends glued with PVA.  This is only a temporary measure.  After the stubs are secure, holes will be punched 5/16" from the joint of the stub and the signature.  These holes, 1/4" apart, will be used to sew the signatures together.  A running stitch is used.  The excess stub is then trimmed away and paper is glued over the stitching line to smooth it out.  We were using a leather spine so we wanted the spine area to be as smooth as possible.

The trimmed spine was pasted,  and a slight rounding was given to the spine to form a shoulder for the cover boards.  Because these were cut ends the rounding is not exactly like a traditional rounded back.  The spine was covered with muslin which would be glued to the covers for additional strength in the hinge area.


My signatures are not as aligned as I would have like them to be.  They slipped slightly during pressing.


Marbled papers and a leather spine were used for the cover.


The third album was a checkerboard binding.  It is an extremely durable binding used in the early Victorian era.  The pages of the album are made from bookboard and then covered with a heavy paper.  The opening for the photographs will be cut into the paper and a slit at the top will allow the photo to be put into the album.

This particular binding is durable because the cloth strips that attach the pages together don't attach one page to the next but wrap around pages.  The odd pages are attached to each other.  The even pages are attached to each other.  The two different colour strips on the spine make it easy to see the odd and even page attachments.


We stained the edges of the bookboard to give the book a more decorative look.  A frame of solid colour paper, similar to that used inside the book was placed on the cover.  Decorative paper was used inside the frame, though a photograph could also have been used.


I haven't cut out the picture frame, hence the solid interior covering.

Dan is a great teacher and we all learned a lot.  The wrapping for the checkerboard spine needs concentration until you can see the pattern.  Thank heavens we did it in two different colours.  The original bindings were done with one colour cloth.  I don't know how they kept their odds and evens straight.

Saturday, August 6, 2011

Making it Our Own

We've been in the house for two years now and finally finished getting all the "must get repaired" things done.  You know the things on the Home Inspection report that require attention and "money". 

At long last we are able to turn our attention to making changes because we want to, not because we NEED to.

We, my niece and I, started in the spring by removing a large circular garden from the backyard.  Believe me, that still left lots and lots and lots of garden.  I transplanted all the varieties of flowers that I wanted to keep to other gardens and then posted a "Free Plants" offer on Freecycle.org for my local area.  For the next week I had people coming by to dig up plants for their own gardens. 

Those that remained were removed and the ground rototilled by my nephew-in-law. Kudos to him.  That was a huge job as the garden was at least 15 feet in diameter and some of those plants had been there for years.  He got the area cleared for me and I put down some landscaping fabric and 10 bags of natural cedar mulch.  We moved our  11' x 11' hexagonal gazebo from its cramped place on the cement patio to the new softer spot waiting for it.  Now it's a shady place for our toddler's toys and a rocking chair for her mom to supervise play.  There is a sand box and room for a small wading pool. 

Next it was time to tackle the inside. 

We replaced the livingroom window -- the seal was broken on several of the lower panes and it was the only older, "high maintenance" window in the house.  It was replaced with an energy efficient three panel window with decorative pewter accents in the smaller, two side windows.

 We also replaced the front door with a new steel door.  The existing door developed a crack in the lower panel (it was wood) and the only thing between us and the outside world was a coat of paint.  Not terribly secure, never mind its tendency to open in the middle of the night even though it was locked.  I'd get up early in the morning to see light in the front hall (which is unusual when you don't have a window in your door) and find that the wooden door had opened by itself -- with the lock still locked.  The only lock between us and the street was the thumblock on the storm door.  Now we have a lovely insulated steel door, with a small stained glass window in textured, clear glass, and a working lock and deadbolt.  Progress!

The livingroom had offwhite carpet when we moved it and I knew that it was going to go.  You can't have a cat, a dalmation and a toddler and an offwhite carpet and keep your sanity.  The carpet had some wear before we moved in and after two years, well --- it's a little more offwhite than it used to be.  The front door is the one that sees all the traffic in our house and that's just not a place for offwhite anything.


Next week, distressed oak laminate is going down in the livingroom and the upper hallway.  That meant I had to get a move on to get the walls painted before that happened.  I didn't take a before picture but I've got an in progress picture that shows the current state of chaos. 


In order to get ready for the floor and painting, I needed to removed a display unit of 4 x4 cubbies.  You can see some of the double cubbies in the picture.  It was an 1.5" too large to get down the staircase to the lower level (where it is going to be a storage unit in the rec room).  That meant I had to dismantle the entire thing, take it down to the lower level (we are in a four level split) and put it all back together.  Luckily, nothing else in the room is that large!


The carpet is also being removed from the upper hallway and the stairs.  Laminate is going in the hallway but the stairs are being recarpeted in a child and pet friendly berber.  The bedrooms already have hardwood flooring so that will make the upper level much lower maintenance.


Those areas received a coat of primer and two coats of paint and are looking pretty good.  I chose Behr Pale Wheat for the livingroom and I love it.  From the first roller strip on the wall I knew it was the right choice for the room.  The front entrance hallway wall is done in Martha Stewart "Graham Cracker Crust".  It makes a nice accent and will look good with the flooring that is going down in the entryway and kitchen -- a fibre floor with a marble like pattern in a gray taupe colour.

The kitchen got it's first coat of Behr "Hazy Skies" which is a lovely blue/gray that will complement the wallpaper wainscotting.  The previous owners were chair rail crazy.  It's in every room in the house but the bathroom.  I removed it from the livingroom and the hallway and my bedroom (which still isn't painted) but left it in the kitchen.  The new colour gives the kitchen a completely new feel.  Once the second coat is complete it will be time to move the furniture out of the rooms in preparation for the flooring. 

These pictures show the kitchen withe the old paint colour and junk piled over every surface.  You can tell that these pictures weren't staged.


The next two weeks will be busy ones.

I'll post before and after pictures when we're done.
Related Posts Plugin for WordPress, Blogger...